Making sense of Ruby on Rails Part 1 - Routes, Actions, Controllers, and Views
I recently decided that I want to learn Rails. Since everyone keeps raving about it, I used Michael Hartl’s Rails Tutorial. While the tutorial was helpful, I felt as if something immensely important was missing from it.
All chapters are basically just draw by the numbers. This approach works to give you a rough idea of how things work in Rails. But at the end of it, I had seen a hundred trees but couldn’t see the forest.
There was just no systematic discussion of the most important concepts. Many puzzle pieces that seemed important were mentioned in passing. But how should I know as a beginner which of them are truly important? Moreover, one of the key features of Rails is that there are lots of conventions. Thanks to these conventions you can write Rails apps incredibly fast. But again, there was no systematic discussion of the most important conventions and I certainly didn’t feel confident to use any of them at the end of the book. Many steps in the book felt like magic because the author never explain what exactly is going on. I mean, it’s cool to see how quickly you can make certain things work. But since my goal is to write Rails apps myself, I need to understand what’s going on.
At the end of the book, there were dozens of unanswered questions in my head like:
- What are the most important fundamental concepts?
- What’s their role and how do they interact?
- Which conventions should I remember?
Since I wasn’t able to find a good article that answers all of them, I decided to write one myself. As you can probably tell by now, I’m by no means an expert. But I’m convinced that this is not necessary a bad thing when it comes to an article like this. Experts usually suffer from the curse of knowledge and have long forgotten what problems beginners are struggling with. This phenomenon is clearly visible in most of the things that are written in the programming world.
For beginners, it’s often advantageous to learn from someone who is just one step ahead of them. At least, I find these kinds of articles tremendously helpful. In this sense, this article is something I wished had existed when I started learning Rails.
I will deliberately skip certain topics that are well explained elsewhere or aren’t essential for beginners. In particular, I will not discuss how to set up a development environment, how to deploy a Rails app to a live server, and how to write tests.
Now without further ado, let’s dive in.
Fundamental Concepts
The most important parts of any Rails app are:
- Routes,
- Controllers,
- Actions,
- Views,
- Models,
- Migrations.
The first four in this list are sufficient if we want to build a boring static site. The remaining two (models and migrations) become important as soon as we want to add dynamic elements to our app that require that we store and retrieve data from a database.
So let’s look at the routes, controllers, and views first.
Routes
To understand their role, we imagine that there is a user who wants to visit our site. He enters our domain name http://example.com into his browser which then sends a request that ends up at the surface of our app. (Technically, this happens via nameservers that translate the domain name into an IP address and a web server software on our server that directs the request to the correct app on the server. But these are more advanced topics we don’t need to know much about to understand how Rails works.)
Hence, the first task our app need to accomplish is yield a response to the request the user’s browser sent to it. There are different kinds of requests a browser can send but the first point of contact between a browser and a web app is typically a GET request. When people just want to see a site, they’re sending a GET request. Another important example is when users fill out a form. When they hit the submit button, they’re sending a POST request. We will discuss how that works below.

In Rails, we define how incoming requests are handled in the routes.rb file which is located at config/routes.rb. We assumed the user entered the root domain http://example.com into his browser. Hence, we need to tell Rails how it should handle GET requests to the root domain.
We do this by writing a line that starts with “root to:” into our routes.rb file. The general structure is:
root to: controller: :CONTROLLER, action: :ACTIONwhere CONTROLLER and ACTION are placeholders for proper controller and action names. A realistic example would be
root to: controller: :home, action: :indexA line like tells Rails that we want that requests to our root domain, should trigger the “index” action in the “home” controller. (We’ll talk about controllers and actions in a moment.)
It is conventional to use a shorthand notation to define routes. For example, exactly the same definition for the root route can be written as
root to: 'home#index'Of course, the user can also send GET requests to different URLs like http://example.com/pizzas or http://example.com/pizzas/marinara (by entering the corresponding URLs into his browser). If we want that the user isn’t shown an error message, we need to define proper routes for these URLs too.
We can do this by writing lines like (again using our shorthand notation)
get '/pizzas', to: 'pizzas#index'This line works completely analogous to the root route. The most important difference is that we specify explicitly how a GET request to http://example.com/pizzas should be handled. In words, we’re telling that a GET request to http://example.com/pizzas should trigger the “index” action of the “pizzas” controller. For the root URL this wasn’t necessary since this is a special case and Rails automatically understands that we’re talking about GET requests in this context. For all other URLs we need to be more precise and specify exactly what kind of request we’re talking about.
If we want to handle the URL http://example.com/pizzas/marinara, we could write
get '/pizzas/marinara', to: 'pizzas#marinara'This would trigger the “marinara” action of the “pizzas” controller as soon as a user visits the URL http://example.com/pizzas/marinara.
However, there are probably lots of related domains like
we want to handle and it would be quite cumbersome to handle each pizza name independently. The proper way to handle this kind of scenario is by telling Rails to treat the name that comes after “/pizzas/” in the URL as a parameter. This will allow us to specify just one pizza detail page that adjust automatically depending on what kind of pizza a user wants to look at. As a simple example, let’s say we call the variable “@pizzaname” and we could then write something like this in a view file (discussed in a moment)
<h1><%= @pizzaname %></h1>to automatically get the correct headline for each pizza.
To accomplish this, we write something like
get '/pizzas/:pizzaname', to: 'pizzas#show'into the routes.rb file. We will then be able to access whatever comes after “/pizzas/” in the url in the “show” action of the “pizzas” controller as
params[:pizzaname]The params object is incredibly important in Rails. Technically, it’s a hash (= a dictionary-like collection). In our example, when the user visits http://example.com/pizzas/marinara, the params hash looks like this:
{
  "controller" => "pizzas",
  "action" => "show",
  "pizzaname" => "marinara"
}
We can see that a hash consists of key-value pairs. For example, the value “pizzas” is assigned to the key “controller”.
Hence, if we use params[:pizzaname] here, the “answer” we’re getting is “marinara”. If a user visits http://example.com/pizzas/funghi, the params hash looks like this
{
  "controller" => "pizzas",
  "action" => "show",
  "pizzaname" => "funghi"
}
and params[:pizzaname] is now equal to “funghi”.
As an aside, take note that you can also pass further parameters to the params hash by using
get '/pizzas/:pizzaname', to: 'pizzas#show', cheese: "true"In this case, there is a new key in the params hash called “cheese” and its value is “true”
{
  "controller" => "pizzas",
  "action" => "show",
  "pizzaname" => "funghi",
  "cheese" => "true"
}
Now what about different kind of requests?
Routing POST requests
There are no surprises when it comes to other types of requests. Let’s assume there is a form located at the site that is shown when users visit http://example.com/pizzas/ that allows them, well, to order pizzas.
We can define what happens when users click the submit button by including a line like
post '/pizzas', to: 'pizzas#order'In words, this means that the order action of the pizza controller gets executed if a post request is sent from the http://example.com/pizzas/ URL.
In this scenario, the most important aspect is the data that the user entered into the form. We can access this data in our code by again using the params hash. Typically, there will be a hash inside our params hash that contains the information the user entered in the form. For simplicitly, let’s say the form only contains a field for the name of the user and another field for the pizza he wants to order. In this case, the params hash would look like this
{
  "controller" => "pizzas",
  "action" => "show",
  "pizzas" => {
               "name" => "Jakob Greenfeld"
               "type" => "Funghi"
              }
}
This will probably make more sense once we discuss how forms are created in Rails. At this point it’s only important to remember that POST requests are handled analogous to GET requests and that the relevant information is stored inside the params hash.
At this point I should mention that no one actually writes routes like this. There are many useful shortcuts and conventions. Nevertheless, it’s important to see everything spelled out so explicitly at least once.
RESTful Routes
While it is possible to define individual routes as we did above, the proper Rails way to handle this task is to think in terms of resources. In this context, the acronym REST is usually thrown around, which is an acronym for REpresentational State Transfer. A common statement is, for example, that Rails applications should be RESTful. For us modest Rails developers this simply means that we should think about most application components as resources.
A key feature of resources is that they can be created, read (=displayed), updated, and deleted. (These four actions correspond to the four fundamental HTML request types: POST, GET, PATCH, and DELETE.)
In our example, pizzas would be a resource. We can create a new type of pizza like Pizza Hawaii. We can update it which could mean to change it’s name or to change the list of ingredients associated with it. We can read and display the information we stored about Pizza Hawaii, and we can delete it, for example, when we find out that no one likes pineapples on their pizza.
Another example for a typical resource are users. Users can be created, shown, updated, and deleted. But also things like user sessions can be thought of as resources and in Rails this is the proper way to do things.
Since Rails app typically revolve around resources, there are many little helpers that make it easier to work with them. In the context of routes, the line
resources :pizzasis a shortcut for seven different routes:
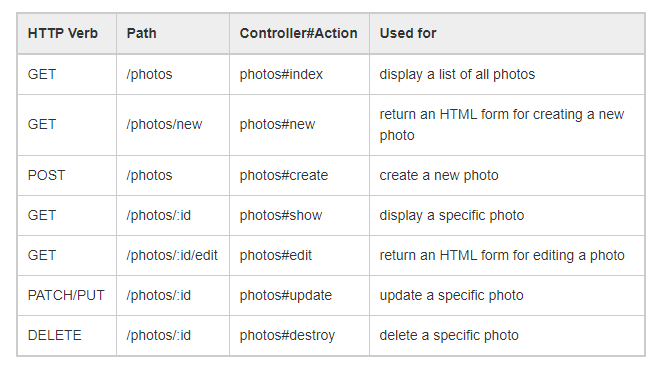
These routes are best understood by considering an explicit example as it is done, for example, in Hartl’s Rails Tutorial. But here’s at least one comment because this was something that confused me:
- The purpose of the “edit” action is to render a view that displays a page where the user or admin can edit the given instance of the resource, for example, a specific photo.
- The purpose of the “update” action is to process the UPDATE request that is transmitted from the form that was shown through the “edit” action.
- Similarly, the “new” action yields a page where users or the admin can add a new instance of the resource (e.g., a new photo) and “create” is the action that processes the POST request that is sent from this page.
It’s also possible to pick from this rich menu just a few specific ingredients by using
resources :pizzas, only: [:index,:new,:create]A shortcut to define this kind of limited resource (i.e. a resource which doesn’t have all the features typically associated with resources) is
resources :pizzas, :shallow => trueIn other words, a “shallow” resource is one which has only index, new, and create actions.
404 Handling
A final aspect worth mentioning is that you don’t have to define a controller#action for every possible route a user could hypothetically enter. There are infinitely many possible URLs and hence this would be an impossible task. Instead, when a user enters a URL we didn’t define explicitly like http://example.com/jashdjksad, Rails automatically sends the response code 404. This response code universally means that the request in question was for a page that doesn’t exist.
Additionally, Rails shows to the user the 404.html page that is located at /public/404.html. You can modify this HTML file to match the style of your page.
The most important message to take away from this section is that routes are the first point of contact between user requests and your app. All routes are defined in a file called routes.rb that is located at /config/routes.rb. This file contains all instructions for how requests should be handled. In the simplest case, a request simply triggers a specific action of a specific controller. Additionally, it often happens that some additional information that is contained in the URL is additionally transmitted to the action that is triggered.

From this description it’s clear that the next part in the chain before our app sends a response to the user are actions and controllers. So let’s talk about these concepts next. (The third part are views, and we’ll talk about them afterwards.)
Actions and Controllers
Let’s continue with our example from above. A user entered http://example.com/pizzas into his browser and since our routes.rb file contains the line
get '/pizzas', to: 'pizzas#index'this request triggers the index action of the pizzas controller.
Controllers are located at /app/controllers. In our case, the corresponding controller would be properly called pizzas_controller.rb and look like this
class PizzasController < ApplicationController

  def index
	render "index"
  end

end
There really isn’t much going on here. The first line states that our PizzasController extends the ApplicationController. This gives us all kinds of functionalities inside the controller without needing to write a single line of code.
The only element inside the controller is an action named “index”. The action consists of just one instruction:
render "index"This definition does exactly what it says. It renders a view called “index”.
Take note that we could equally write:
class PizzasController < ApplicationController

  def index
  end

end
This works because Rails automatically connect a controller action to a view of the same name. The explicit render command is only necessary if the name of the view is different from the name of the controller action.
Usually, we don’t just want to display a static site. For example, above we discussed a route with a dynamic element:
get '/pizzas/:pizzaname', to: 'pizzas#show'To make this route work, we need to define a show action inside the pizzas controller:
class PizzasController < ApplicationController

  def index
  end

  def show
  end

end
With this simple controller, our Rails app simply shows the “show” view to the user and completely ignores the dynamic “:pizzaname” in the URL. If we want to make this dynamic element available in the view, for example, to be able to include it in the headline, we need to modify the controller.
class PizzasController < ApplicationController

  def index
  end

  def show
	@pizzaname= params[:pizzaname]
  end

end
The additional line here defines an “instance variable” called @pizzanme that is also available outside of the block in which it is defined.
With this line in place, we can successfully update the headline dynamically depending on which “:pizzaname” appears in the headline.
There is typically a lot more going on inside a controller. But since we haven’t talked about models so far and most of these additional things going on are related to models, let’s move on to views first.

Views
A view is a typically an .html.erb file where “erb” is an acronym for embedded ruby. Although views can be pure HTML files, the additional suffix .erb makes sure that we can also include Ruby code in views. This is important, for example, when we have variable elements like the @pizzaname variable mentioned above.
All view files are located at /app/views. For each controller, there is a folder and for each action within the controller that requires a view, there is an .html.erb file of the same name.
So in our example, we have a folder named “pizzas” that is located at /app/views that contains two files:
- index.html.erb
- show.html.erb
The first one, index.html.erb, is what gets rendered when a user visits http://example.com/pizzas. This is a result of the line
  def index
	render "index"
  end
in the pizzas controller. As mentioned above, the second line is actually optional since Rails automatically renders the view with the same name.
The content of our index.html.erb file could be just ordinary HTML code, maybe a line like
<h1>Our Pizzas</h1>and then a short paragraph.
An thing we need to remember about views is that there is a “master” file that is always rendered. The views we just talked about are then inserted into this “master”-view.
The master file lives inside the /app/views/layout folder and is called application.html.erb. Typically, this file contains a lot of the structure all of our pages have in common like
<!DOCTYPE html>
<html>
<head>
Additionally, there is a line
<%= yield %>which indicates where our views get inserted.
The syntax
<%= RUBY CODE %>tells Rails that what goes in between <%= and %> is Ruby code. A subtlety is the equal sign that appears here that indicates that whatever is the result of the Ruby code should be inserted here. For example, if we write
<%= 5+3 %>there an 8 will be inserted in our view. Oftentimes, we want that just some Ruby code gets executed and nothing added. In this case, we use the same notation without an equal sign:
<% RUBY CODE %>This makes sense, for example, when we define a variable or start a loop procedure.
Now back to our specific views. In our example above, we also added a the code
  def show
     @pizzaname= params[:pizzaname]
  end
to the pizzas controller. The idea was that if a user visits http://example.com/pizzas/funghi, we want that the word “funghi” gets automatically added to the view. This way, we only have to define one view for all pizza detail pages. The “show action” renders automatically the “show view” which is defined in show.html.erb that is located at /app/views/pizzas. (Again, we could’ve made this more explicit by added the line
render "show"to the show action definition.)
Inside the show.html.erb file, we can now write something like
<h1><%= @pizzaname %> </h1>to get a fitting headline for our detail page. As discussed above, the notation <%= indicates that result of the Ruby code should be inserted. We simply call here a variable called and hence whatever is stored inside the variable gets returned and displayed on the site. If a user visits http://example.com/pizzas/funghi, @pizzaname is equal to the word funghi, thanks to the definition in the show action. Similarly, if a user vists http://example.com/pizzas/margherita, the headline on our page says “margherita”.
Take note that what we’re doing here is not a particularly smart approach. Anything that gets entered behind /pizzas/ in the URL gets printed as the headline. We’re not validating in any way if there really is a pizza with this name.
This is just a toy example to understand the fundamentals of Rails. The proper way to handle such a scenario (with different pizza names etc.) would be to treat pizzas as a real resource and thus add a corresponding model to the app. We can then retrieve pizza names from the database and compare if what is written behind /pizzas/ in the URL is a proper name that should return a detail page. If not, we could return our standard 404 page mentioned above.
But if we want to create a pure content site without any dynamic functionality like a form to order pizzas, it could make sense to just create an individual view and dedicated route for each pizza type. (In that case, however, you probably shouldn’t use Rails anyway. Something like Jekyll would be a much better fit.)

The puzzle pieces we have discussed so far (routes, controllers, actions, and view) are completely sufficient if we want to build a “pure content site” that doesn’t require interactions with a persistent data storage like a database. But if we want to enable our user to submit data (which then gets stored in a database) and modify existing data (with updates submitted to the database), we need to talk about models and migrations.
This will be the topic of the second part.
PS: If you're interested in following my journey, sign up below: